+49 (0) 7721 9896-96 ✔ Delivery time 3-5 working days

Tarte Tatin recipe without oven
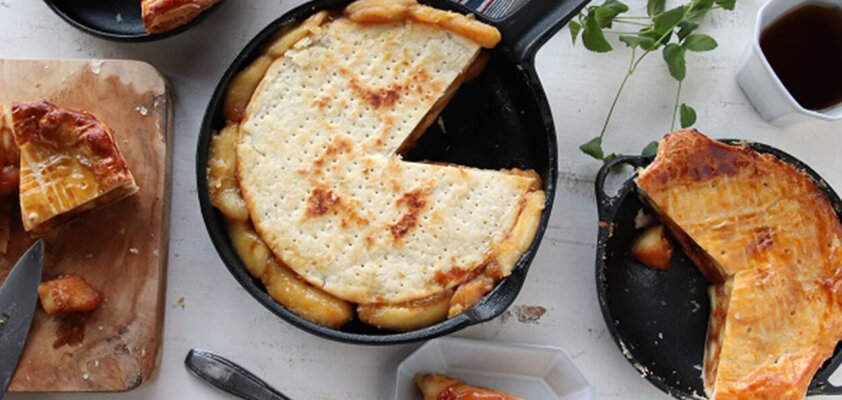
Tarte Tatin from the cast iron pan | Recipe at ORYOKI

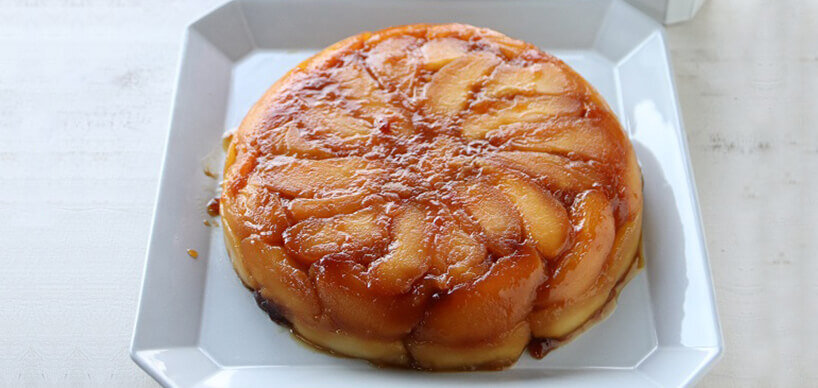
A Tarte Tatin is a French dessert, traditionally made with apples and puff or shortcrust pastry. The apples are caramelized in sugar and butter, covered with the pastry, and baked in the oven. Subsequently, the tart is inverted from the mold, placing the apples on top and the caramel distributed over them. The Tarte Tatin can be served warm or cold and is often accompanied by a scoop of vanilla ice cream or whipped cream. There are also variations with other fruits such as pears or peaches, or even savory versions with vegetables.

What is the origin of the name Tarte Tatin?

The name Tarte Tatin comes from the Tatin sisters, Caroline and Stéphanie, who operated an inn called "Hotel Tatin" in the 19th century in the French region of Sologne. The story goes that one day, one of the sisters forgot to place the dough into the pan for their apple pie before it went into the oven. To rectify this, she placed the dough on top of the apples and inverted the cake after baking, so that the apples were on top and the dough beneath. Guests were so delighted by this unusual creation that the sisters decided to feature it on the menu, and the Tarte Tatin was born.

The cast iron pan as a tarte tatin baking dish - without oven

A Tarte Tatin can be prepared very well in a cast-iron skillet. In fact, the use of a cast-iron skillet is recommended by many chefs as it evenly distributes heat and forms a crispy crust. Additionally, no oven is needed; it can be baked on the stovetop with the cast-iron skillet. This is also known as "Stovetop Tarte Tatin" and is a practical method, especially when an oven is not available.

Recipe for the French classic tarte tatin

No. of persons8 portionsNo. of persons
Total Timeca. 75 minutesTotal Time
Level of difficultyeasyLevel of difficulty
DishDessertDish
Calories350kcal per portionCalories
Kitchenware Kitchenware
Cast iron pan 24 cm diameter , Corrugated wood , Mixer , Plate
Tarte Tatin
List of ingredients
100 g (cake) flour
50 g soft butter
a pinch of salt
400 ml cold water
9 pieces apples (the taste of the tart may vary depending on the type of apple)
200 g crystallized sugar
60 g butter
Kochende Miss Oryoki
Tarte Tatin preparation
Preparation
Step 1

Place the cake flour, butter and salt in a bowl and mix everything together thoroughly until the mixture is uniform.

Step 2

Add cold water and mix everything carefully until you have a smooth dough. Then wrap it in cling film and leave it to rest in the fridge for at least 30 minutes.

Step 3

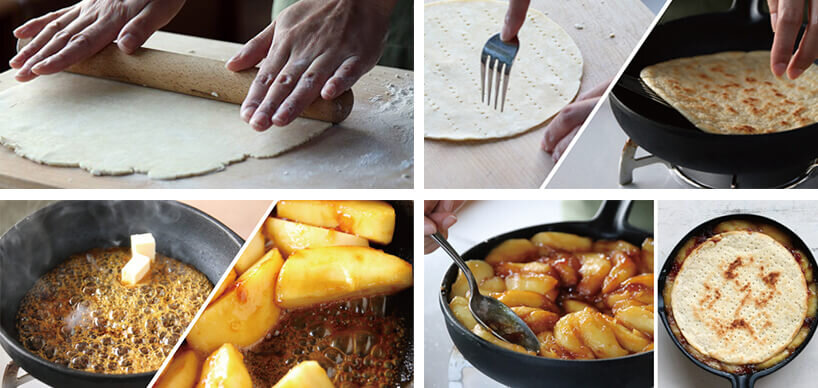
Roll out the dough with a rolling pin and cut it to the shape of your cast-iron frying pan.

Step 4

Prick holes in the dough with a fork and leave to rest again in the fridge for at least 30 minutes. Now fry it briefly in the cast iron pan over a medium heat until it turns a light brown color. Then put it to one side.

Step 5

Now peel the apples and remove the core. Cut them into 8 equal pieces.

Step 6

Pour half of the granulated sugar (100g) into the cast iron pan and heat it up. As soon as the sugar starts to melt, turn off the heat and add half of the butter (30g). Only now should the sugar and butter mixture be stirred once carefully.

Step 7

Add about half of the prepared apple pieces and reheat the stove. As soon as the apples are nicely caramelized, transfer them to a container. Now prepare the remaining apples in the same way. It makes sense to do this step twice so that the apples have enough space in the pan and can be coated evenly with caramel.

Step 8

The caramelized apples can now be arranged in a circle in the iron pan. Finally, place the dough on top and heat for approx. 15-20 minutes over a medium heat in the cast iron pan. The honey-like caramel nestles around the apple pieces and the dough cover and binds the ingredients together to form a firm cake during baking. The caramel penetrates the apple pieces and gives them an intense flavor.

Step 9

It is best to turn the caramelized apple tart out of the pan when it is still warm, as the caramel will still be soft and the apples will not stick to the pan as easily.

Step 10

Serve the cake slices as a dessert on a serving plate with cream or vanilla ice cream - bon appétit!

Japanese cheesecake read in the magazine »
Newsletterbadge Newsletterpfeil

Newsletter subscribe now

Our newsletter subscribers are the first to be informed!!

News about products, manufacturers & designers
and cultural topics relating Japan

Newsletterpfeil
Newsletterpfeil
Newslettermockup
Recipes

Newsletter

Our newsletter will inform you about
exciting new posts about the
Japanese culture!

Sign up now!

Newsletterbild
The latest   blog entries